

 Canada (en)
 Germany (de)
 Austria (de)
 France (fr)


Mini Counter Vacuum

Clean Your Counters Fast
Crumbs don’t stand a chance against the cordless Mini Counter Vacuum. This will be your new go-to for tackling the tiny messes that show up after snack time, mealtime, and everything in between.
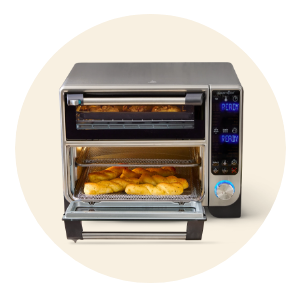
Palm-sized yet powerful, this small vacuum comes with two ingenious attachments that you can use to get into tight corners and hard-to-reach spots in drawers, air fryers, and even toaster ovens. Stuck-on bits will become a thing of the past thanks to the four built-in scrapers. Just scrape, vacuum, and you’re done!
With the Mini Counter Vacuum in your home, you won’t have to drag out the big vacuum for a small kitchen cleanup or worry about caked-on bits in the cracks of your kitchen. Plus, because it’s small, you can easily store it on your countertop or tuck it in a drawer so it’s always available when you need it most.
Why You’ll Love It
- Quickly power it with two AA batteries, so it’s always ready when you are.
- Includes two attachments to help you clean drawers, fridge corners, and hard-to-reach appliance crevices.
- Built-in scraper edges remove stuck-on bits fast.
- It’s easy to use and comfortable to hold.
- It’s small enough to live on your kitchen countertop or in a drawer.
- Store the attachments in the included storage bag for easy storage.
Product Details
- Includes the Mini Counter Vacuum, two attachments, and a canvas storage bag
- 7½'' x 2½'' x 3¾'' (19 cm x 6 cm x 9.5)
- Made with plastic, nylon bristles, and canvas
- Requires 2AA batteries (not included) to run
- Use it to clean up crumbs, spilled seasonings (not fine powders like flour), and more in the kitchen
-
Use & Care
Use & Care
Use & Care
SAFETY AND USE INSTRUCTIONS
- Read, understand, follow, and save all Safety and Use Instructions to avoid injury.
WARNING
- • When using this appliance, basic safety precautions should always be followed, including the following. Read all the instructions.
- • Adult supervision is required when using with children or persons with lack of experience and knowledge.
- • To protect against electric shock, DO NOT immerse the base, accessories, or any other part of the appliance in water or other liquid.
- • DO NOT operate the appliance on an unstable or wet surface. Always operate the appliance on a stable, dry, and level surface.
- • Never force parts or accessories together. See Use section for directions on assembly.
- • Keep body parts, hair, loose clothing, and utensils away from the appliance when using to avoid damage or injury. Hold the vacuum tightly when using.
- • DO NOT operate if the appliance is damaged in any way.
- • DO NOT turn the appliance on while it is disassembled.
- • Only use accessories or attachments that are sold by Pampered Chef and are designed for use with this unit. The use of non-Pampered Chef or non-approved accessories or attachments may cause injuries or damage to the unit. Any accessory or attachment that has been damaged in any manner must not be used.
- • For indoor use only.
- • Do not run the appliance for more than 5 minutes at a time.
- • For good battery health, it is recommended to use the appliance every 3 months to ensure life of the batteries, or remove the batteries when not in use for extended periods of time.
- • This appliance is used to clean thin and small particles like salt. NEVER use to clean large pieces like tea leaves or materials that clump like flour.
- • DO NOT attempt to modify or repair the unit or any part inside, as this may cause electric shock, fire, melting, or injury.
- • DO NOT put fingers or objects in the vacuum while in use for your safety and the functioning of the appliance.
- • Keep away from heat sources. Do not place the appliance near an open flame, cooking or heating appliance, or hot surface.
- • DO NOT leave the appliance unattended when in use.
- • Always hold the appliance when in use.
SAFEGUARDS
- • This appliance is intended for normal domestic household use only.
- • DO NOT use the appliance for anything other than its intended use.
- • If using with fabric, use provided attachments only. Brushes on vacuum may snag fabric surfaces.
- • For indoor use only.
PARTS
PARTS A. Top Cover
B. Battery Access Button
C. On/Off Switch
D. Filter Housing
E. Bottom Cover
F. Scraper Edge
G. Brush Bristles
H. Fan
I. Filter
J. Hose Attachment
K. Crevice Attachment
L. Storage Bag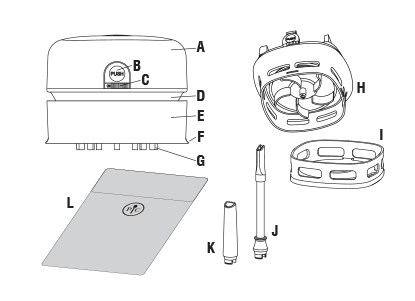
CLEANING
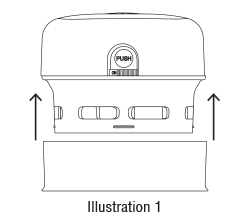
- • Make sure the vacuum is off by turning the On/Off Switch to the off position. Open the Bottom Cover according to the direction shown in illustration 1.
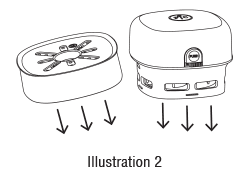
- • Empty debris from Bottom Cover and Filter Housing into a garbage can. See illustration 2.
- • For best results, empty frequently.
- • To clean the Filter, remove it from the appliance and clean it with a brush. NEVER use water in the filter.
- • Hose and Crevice Attachments are wipe clean only. Do not immerse in water or run water through the Hose Attachment.
- • If the Battery leaks or corrodes, DO NOT attempt to clean it or to use the appliance.
- • Storage Bag is spot clean only.
- • Only store accessories in the provided Storage Bag. Do not kink the Hose Attachment when storing in the Storage Bag.
USE AND CARE
- • Note: For best results, always use the vacuum in an upright position.
- • The appliance uses two AA 1.5V (R6) batteries. Follow instructions on battery packaging.
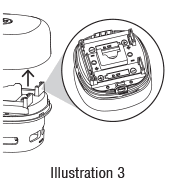
- • To install batteries, make sure the On/Off Switch is in the off position. Press the button on side to open the Top Cover. Remove the Top Cover and install the batteries in the slots using the +/- as guides. Replace the Top Cover. See illustration 3.
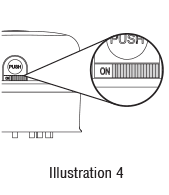
- • Use the On/Off Switch to turn the vacuum on and off. See illustration 4.
Accessories
- • Always assemble the product completely before turning on.
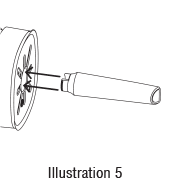
- • To place the Hose Attachment or Crevice Attachment accessories, position the base attachment end in opening at the bottom of the vacuum. Press in until secure. See illustration 5.
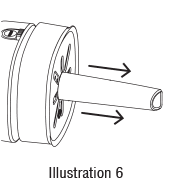
- • To remove accessories, firmly grasp the base attachment end of the accessory and Bottom Cover of the vacuum and pull apart. See illustration 6
GUARANTEE
- • Three-year guarantee for noncommercial use. Refer to our website or the sales receipt for details.
Made in China
Guarantee
Use & Care
SAFETY AND USE INSTRUCTIONS
- Read, understand, follow, and save all Safety and Use Instructions to avoid injury.
WARNING
- • When using this appliance, basic safety precautions should always be followed, including the following. Read all the instructions.
- • Adult supervision is required when using with children or persons with lack of experience and knowledge.
- • To protect against electric shock, DO NOT immerse the base, accessories, or any other part of the appliance in water or other liquid.
- • DO NOT operate the appliance on an unstable or wet surface. Always operate the appliance on a stable, dry, and level surface.
- • Never force parts or accessories together. See Use section for directions on assembly.
- • Keep body parts, hair, loose clothing, and utensils away from the appliance when using to avoid damage or injury. Hold the vacuum tightly when using.
- • DO NOT operate if the appliance is damaged in any way.
- • DO NOT turn the appliance on while it is disassembled.
- • Only use accessories or attachments that are sold by Pampered Chef and are designed for use with this unit. The use of non-Pampered Chef or non-approved accessories or attachments may cause injuries or damage to the unit. Any accessory or attachment that has been damaged in any manner must not be used.
- • For indoor use only.
- • Do not run the appliance for more than 5 minutes at a time.
- • For good battery health, it is recommended to use the appliance every 3 months to ensure life of the batteries, or remove the batteries when not in use for extended periods of time.
- • This appliance is used to clean thin and small particles like salt. NEVER use to clean large pieces like tea leaves or materials that clump like flour.
- • DO NOT attempt to modify or repair the unit or any part inside, as this may cause electric shock, fire, melting, or injury.
- • DO NOT put fingers or objects in the vacuum while in use for your safety and the functioning of the appliance.
- • Keep away from heat sources. Do not place the appliance near an open flame, cooking or heating appliance, or hot surface.
- • DO NOT leave the appliance unattended when in use.
- • Always hold the appliance when in use.
SAFEGUARDS
- • This appliance is intended for normal domestic household use only.
- • DO NOT use the appliance for anything other than its intended use.
- • If using with fabric, use provided attachments only. Brushes on vacuum may snag fabric surfaces.
- • For indoor use only.
PARTS
PARTS A. Top Cover
B. Battery Access Button
C. On/Off Switch
D. Filter Housing
E. Bottom Cover
F. Scraper Edge
G. Brush Bristles
H. Fan
I. Filter
J. Hose Attachment
K. Crevice Attachment
L. Storage BagCLEANING
- • Make sure the vacuum is off by turning the On/Off Switch to the off position. Open the Bottom Cover according to the direction shown in illustration 1.
- • Empty debris from Bottom Cover and Filter Housing into a garbage can. See illustration 2.
- • For best results, empty frequently.
- • To clean the Filter, remove it from the appliance and clean it with a brush. NEVER use water in the filter.
- • Hose and Crevice Attachments are wipe clean only. Do not immerse in water or run water through the Hose Attachment.
- • If the Battery leaks or corrodes, DO NOT attempt to clean it or to use the appliance.
- • Storage Bag is spot clean only.
- • Only store accessories in the provided Storage Bag. Do not kink the Hose Attachment when storing in the Storage Bag.
USE AND CARE
- • Note: For best results, always use the vacuum in an upright position.
- • The appliance uses two AA 1.5V (R6) batteries. Follow instructions on battery packaging.
- • To install batteries, make sure the On/Off Switch is in the off position. Press the button on side to open the Top Cover. Remove the Top Cover and install the batteries in the slots using the +/- as guides. Replace the Top Cover. See illustration 3.
- • Use the On/Off Switch to turn the vacuum on and off. See illustration 4.
Accessories
- • Always assemble the product completely before turning on.
- • To place the Hose Attachment or Crevice Attachment accessories, position the base attachment end in opening at the bottom of the vacuum. Press in until secure. See illustration 5.
- • To remove accessories, firmly grasp the base attachment end of the accessory and Bottom Cover of the vacuum and pull apart. See illustration 6
GUARANTEE
- • Three-year guarantee for noncommercial use. Refer to our website or the sales receipt for details.
Made in China
Guarantee


