
 Canada (en)
 Germany (de)
 Austria (de)
 France (fr)


Flex+ FAQ
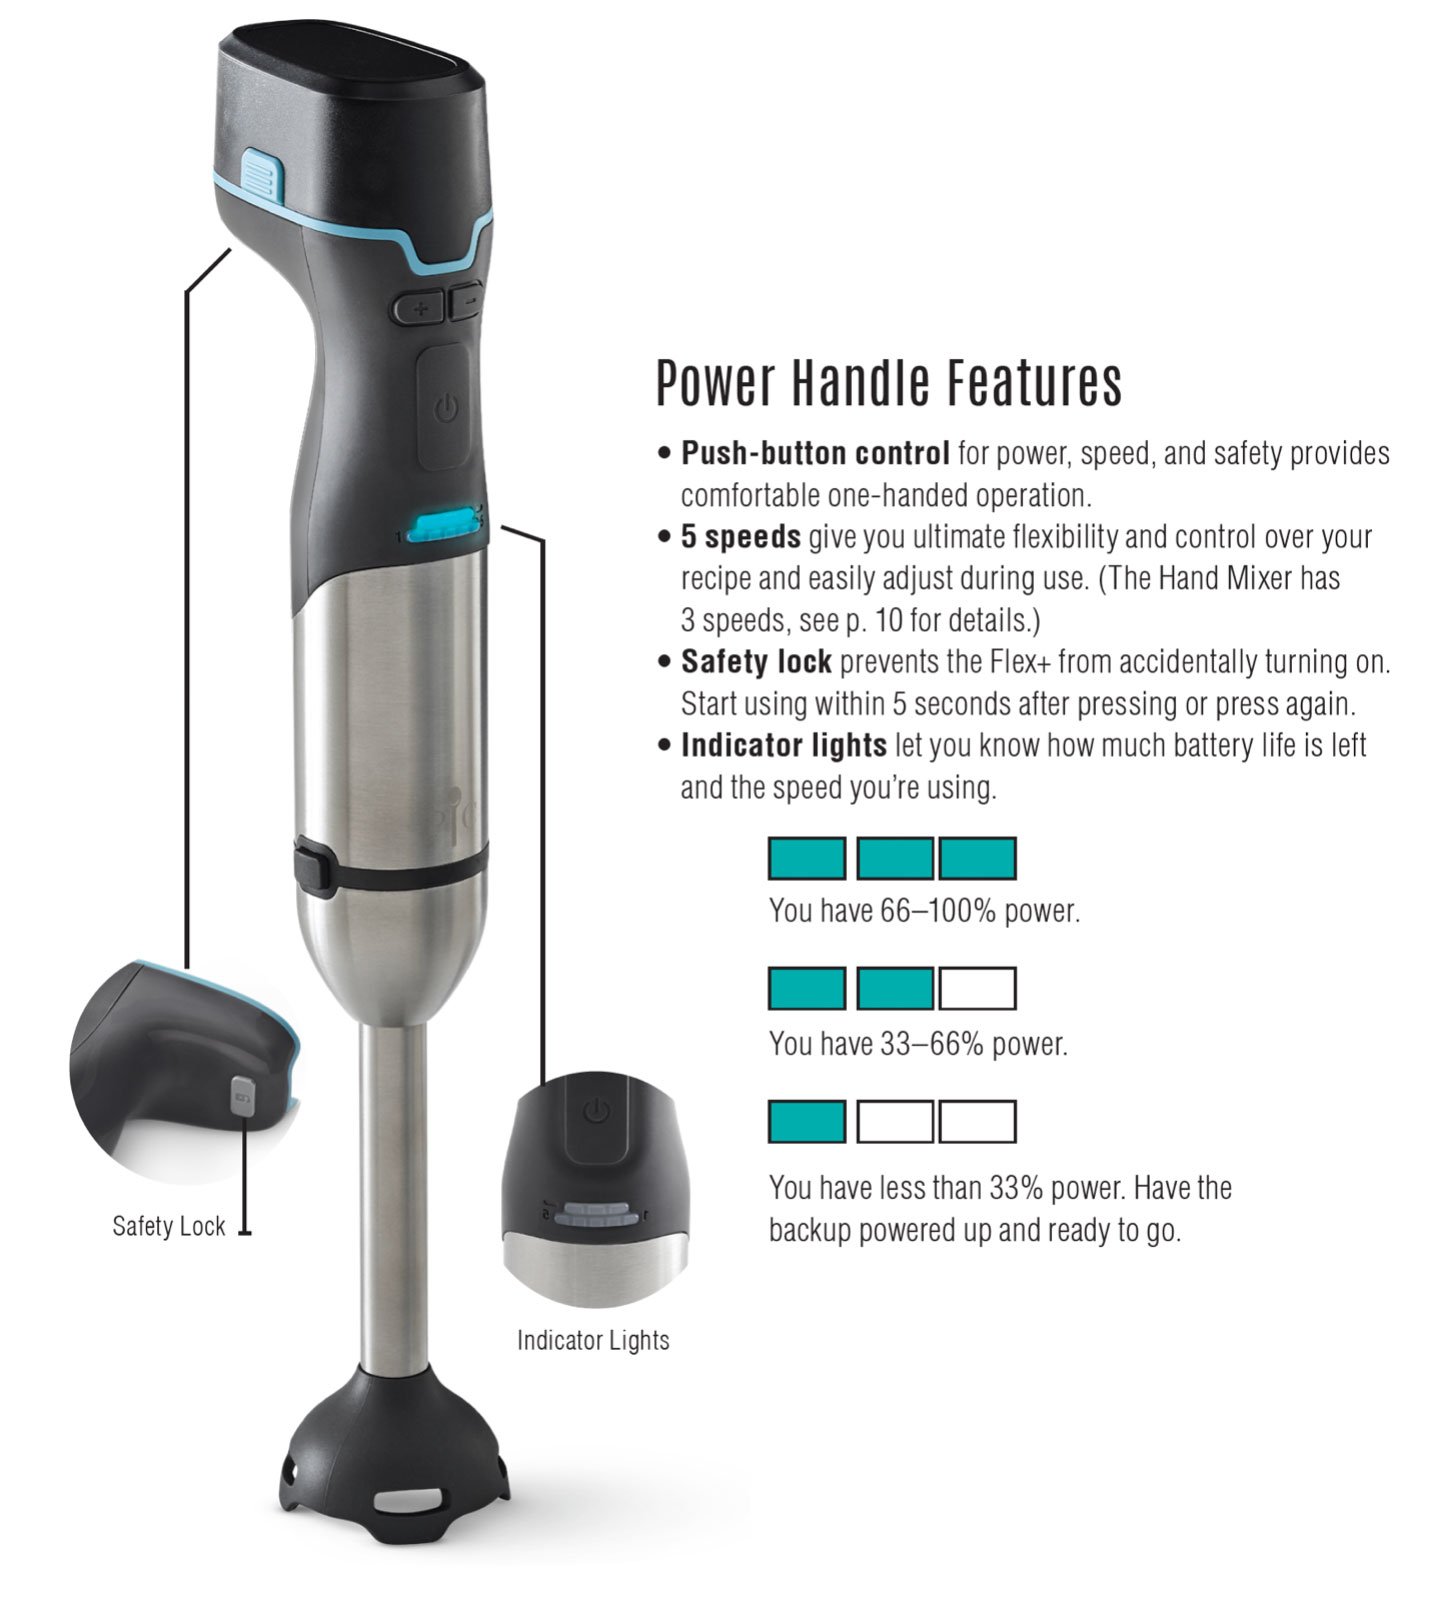
When using the Immersion Blender and Food Processor attachments, there is a safety lock Button on the back. This button has to be pressed each time you use the appliance. Once pressed, you can use the appliance for 5 seconds. This allows for pulsing. When using the Hand Mixer attachment, there is a safety switch at the top. This needs to be pressed each time you are turning on a speed from the off position.
It takes approximately 2–2.5 hours for the battery to charge fully. You can “quick charge” the battery to get 5 minutes of run time by charging in the charging station for 30 minutes.
When the battery is fully charged it will run intermittently for up to 30 minutes, depending on the food being mixed.
a. Make sure the batteries are charged, the light on the charger should be a solid green.
b. Make sure the power handle lights come on when the battery is attached. Blue and white indicator lights should light up.
c. The saftety button should be pressed and the unit operated within 5 seconds.
d. If this doesn’t solve the issue, contact our Solution Center at (888) 687-2433 (U.S.) or (800) 342-2433 (Canada) for help.
Here’s a guide to what you should use each Flex+ attachment for.
| Attachment | Best For | Notes |
| Immersion Blender | Milkshakes, smoothies (with fresh fruit, not frozen), blended coffee drinks, soups, purees, sauces | Some suction to the bottom of a vessel is normal with immersion blenders. To minimize, tip the blade at an angle away from you before fully submerging and blending food and leave some space between the blending head and the bottom of the vessel. Not recommended for hard foods such as frozen fruit and ice. |
| Hand Mixer with whisks | Cream, egg whites | To incorporate air, gradually increase the speed from low to high. |
| Hand Mixer with beaters | Batters, doughs | To prevent splashing, start at a low speed when adding ingredients then increase to a higher speed. |
| 6-cup (1.5-L) Food Processor with the multiuse blade | Dips, doughs, sauces, vegetables, fruits | With heavy loads such as dough, we recommend pulsing. |
| 6-cup (1.5-L) Food Processor with the reversible grating blade | Vegetables, fruits, cheeses | Do not use force when grating, only use a light touch and let gravity do the work. |
| 6-cup (1.5-L) Food Processor with the reversible slicing blade | Vegetables, fruits | Do not use with cheese or hard foods. Do not use force when slicing fruits and vegetables, only use a light touch and let gravity do the work. |
General
Flex+ Multi-Prep Set 101
The Flex+ is a three-in-one, cordless tool, so you can prep without connecting to an outlet. It features a power handle that attaches to an Immersion Blender, Hand Mixer, and Food Processor attachment. It also includes two replaceable batteries and a charging station.
The cooking guide that came with your Flex+ has great recipes for using it and each of its attachments—check out the “3 Recipes to Get Started” section! The Flex+ is also great for speeding up the prep time of many recipes with directions that include blending, mixing, whisking, chopping, slicing, or grating.
The Flex+ is made of the materials below.
Stainless steel
Plastics (PP, PA, TPE, and others)
Flex+ Food Processor Bowl: Tritan
Flex+ Blending Container: SAN
Electric Motor
Li-Ion rechargeable battery pack
Electrical components (circuitry, wiring, switches, and LEDs)
Battery
The Flex+ includes two replaceable batteries.
We recommended charging both of your batteries as soon as you open your Flex +. Information on how to charge the batteries is in your U&C. It takes approximately 2–2.5 hours for the battery to charge fully.
Do not throw batteries in the garbage. Contact your local waste collection agency for proper recycling or disposal information for your area.
22.2 Wh.
11.1 VDC output.
2Ah.
It is normal for electronics to get warm with use. When using with a heavy load (dense or large chunks of food, etc.), do not operate the Flex + continuously for more than 1 minute. Allow the motor to rest for 1 minute between each use. If the unit becomes excessively hot, discontinue use and contact the Solutions Center at (888) 687–2433 (U.S.) or (800) 342–2433 (Canada) for assistance.
About 3 months.
The battery can remain on the charger for up to 3 months. Warning: Always remove the battery and/or unplug when not in use.
Protective coatings are applied during manufacturing. The smell may be from these coatings. These coatings are non-toxic. This can occur on the first use and is considered normal and harmless. If the smell persists or visual smoke is observed, stop using and call the Solutions Center at (888) 687–2433 (U.S.) or (800) 342–2433 (Canada) for assistance.
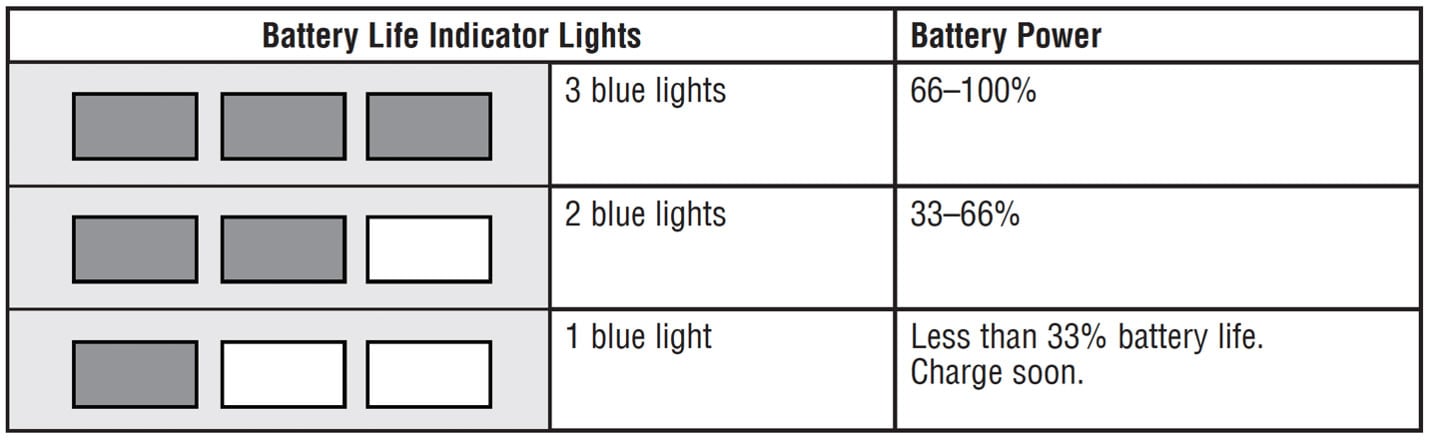
You can check the charge of your battery with either the charging station or the power handle.
To check the charge of your battery with the charging station, place the Flex+ battery on the charging station. If the charging station’s light is green, your battery is fully charged. If the charging station’s light is red, the battery is not fully charged.
To check the charge of your battery with the power handle, check the indicator lights on the power handle. Please see the chart below.
You can make a ton of food with a fully charged battery! Here are some examples.
• Immersion Blender: Blend up to 93 bowls of soup with one fully charged battery.
Based on 12 oz. (350 g) bowls, 11 batches of tomato soup
• Hand Mixer: Make up to 576 2" (5-cm) cookies with one fully charged battery.
Based on 16 batches of chocolate chip cookies
• Food Processor (Multiuse Blade): Chop up to 60 onions with one fully charged battery.
Based on an onion size of 90–110 g
• Food Processor (Grating Blade): Grate up to 8½ blocks of cheese with one fully charged battery.
Based on an 8 oz block of cheddar cheese
• Food Processor (Slicing Blade): Slice up to 330 zucchini with one fully charged battery.
Based on an average size of 167 grams
Components
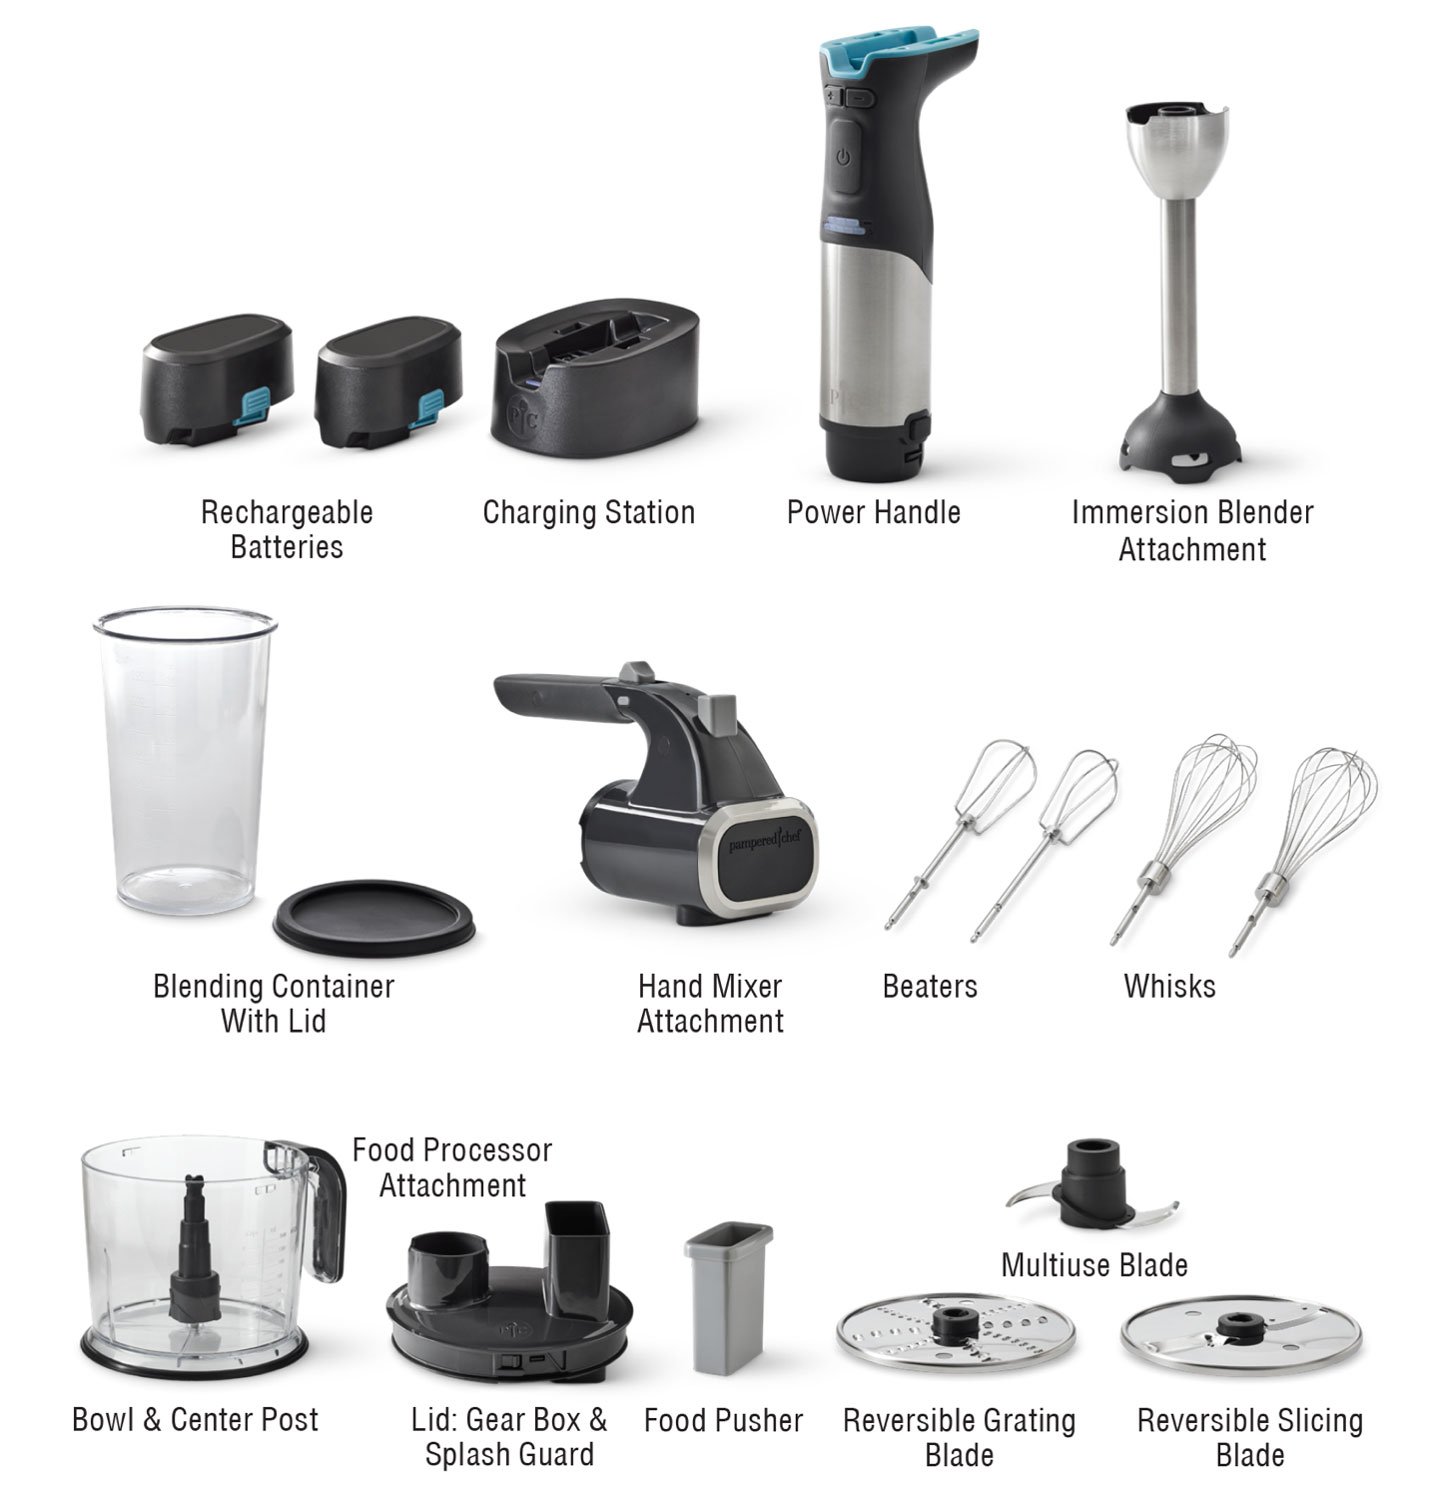
The Flex+ includes the components below.
CLEANING
Before cleaning any part of this unit, unplug from the power source, and remove the battery, attachment, and any accessories.
| Wipe clean | Charging station, power handle, Hand Mixer attachment, batteries (only use a dry cloth on or around the connectors) |
| Hand wash; do not submerge | Food processor lid |
| Dishwasher-safe when placed away from the heating element | Blending container and lid, beaters, whisks, splash guard, splash guard gasket, food processor bowl, food processor center post, multiuse blade, reversible grating blade, reversible slicing blade, and food pusher. Immersion Blender attachment: Hand washing with warm, soapy water and a nylon scrub brush is recommended. Keep fingers away from blade. If preferred, Immersion Blender attachment may be dishwashed. |
Note: Allow all pieces to dry completely before using or storing.
Food processor bowl:
• Over time and continued use, the bowl may show some scratching; this is normal.
• Coffee, tomatoes, and citrus products may cause slight discoloration, so it's best to wash and rinse the bowl after each use.
• If food gets into the handle of the bowl, rinse immediately. If food has dried inside the handle, soak in warm soapy water and then rinse.
• The nonslip foot ring can be removed for cleaning if necessary.
First, make sure that your battery is fully charged. If it’s not, charge it on the charging station until the light is green.
If the battery is fully charged, you may have been mixing a load that’s too heavy. Keep your hand away from the sharp blades and remove the battery. Allow the Flex+ to cool, then try removing some food.
Remember not to use the Immersion Blender attachment with large chunks of ice or frozen fruit. Also, only apply a light touch when using the food pusher of the Food Processor attachment. Never slice cheese with the Food Processor attachment’s slicing blade.
You can also reference the troubleshooting guide in the use and care. If this doesn’t solve the issue, contact our Solution Center at (888) 687-2433 (United States) or (800) 342-2433 (Canada) for assistance.
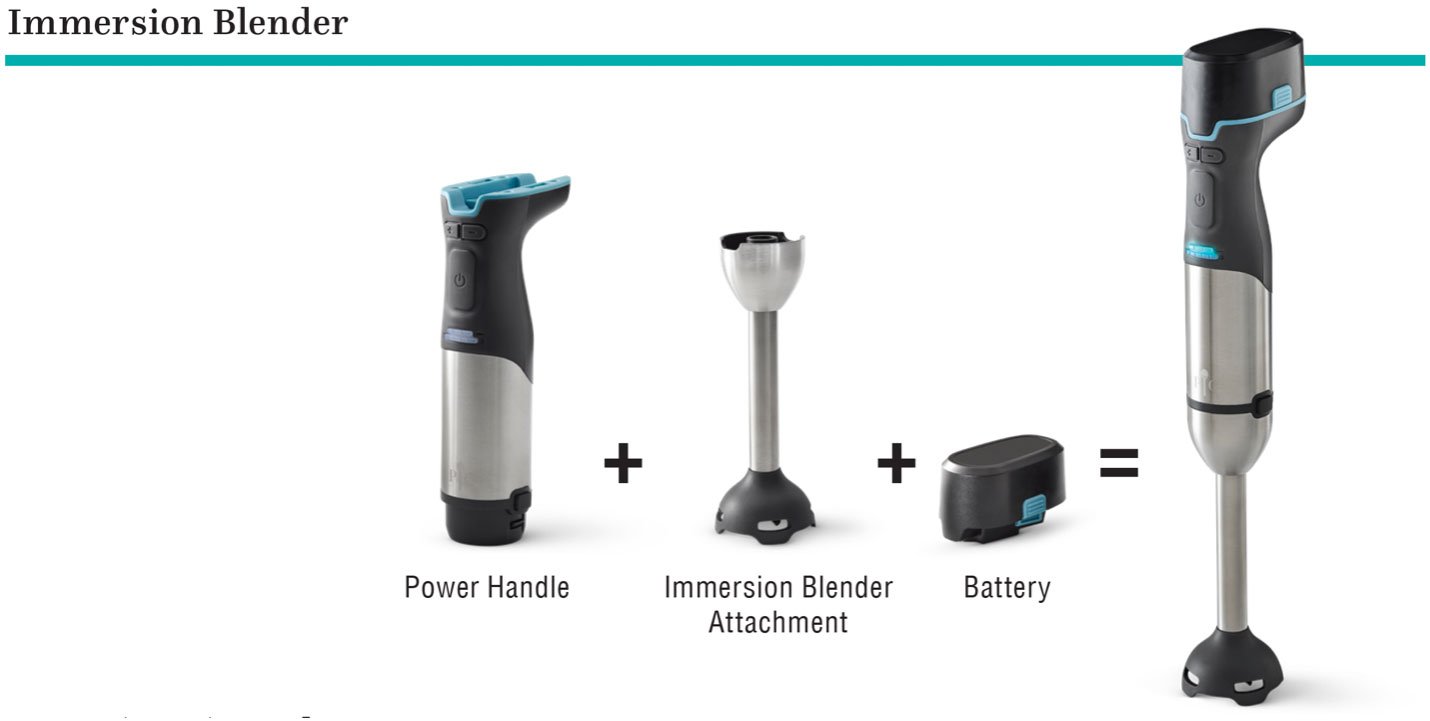
Immersion Blender
Remember, the battery is always installed last and removed first. Here’s a guide to assembling the Immersion Blender attachment.
Here’s a guide to cookware and bowls that you can use with the Flex+ Immersion Blender and Hand Mixer attachments.
| Flex+ Attachments & Vessels | Immersion Blender We recommend using the blender in cookware vessels and where the blender head is fully submerged. |
Hand Mixer Please note that the Hand Mixer attachment may scratch any plastic. |
| Plastic Mixing Bowls | Secondary use. | Recommended use. |
| Stainless Steel Mixing Bowls | Secondary use. | Recommended use. |
| Glass Mixing Bowls | Not a recommended use. | Not a recommended use. |
| Batter Bowls | Not a recommended use. | Not a recommended use. |
| Nonstick | Recommended use with the tools below. 2-qt. (1.9-L) Nonstick Sauce Pan, 5.25-qt. (5-L) Nonstick Stock Pot, Multipot With Collapsible Steamer, 12" (30-cm) Nonstick Skillet, or Nonstick Saute & Steam pan. Head fully covered. |
Not a recommended use. |
| Stainless Steel Nonstick | Recommended use with the tools below. Stainless Steel Nonstick Wok. |
Not a recommended use. |
| Raw Cast Iron | Recommended use with the tools below. 10" (25-cm) Skillet or 12" (30-cm) Skillet. Head fully covered. |
Not a recommended use. |
| Enameled Cast Iron | Recommended use with the tools below. 6-qt. (5.7-L) Enameled Cast Iron Dutch Oven, Enameled Cast Iron Skillet With Lid, or 14”X10” Enameled Cast Iron Pan. |
Not a recommended use. |
| Rockcrok® | Recommended use with the tools below. Rockcrok® Everyday Pan or Rockcrok® Dutch Oven. |
Not a recommended use. |
| Fully or Partially Unglazed Stoneware | Recommended use with the tools below. Deep Covered Baker, Mini Deep Covered Baker, or Rectangular Baker. |
Not a recommended use. |
| Fully Glazed Stoneware | Recommended use with the tools below. Medium Serving Bowl |
Not a recommended use. |
| Quick Cooker Inner Pot | Recommended use. | Recommended use. |
| Quick Cooker Ceramic Pot | Recommended use. | Not a recommended use. |
| Micro-Cooker® | Recommended use. | Recommended use. |
| Quick-Stir® Pitchers | Not a recommended use. | Not a recommended use. |
| Insulated Serving Bowls | Recommended use. | Not a recommended use. |
| Cool & Serve Bowls | Recommended use. | Not a recommended use. |
| Kid’s Mixing Bowl | Recommended use. | Recommended use. |
| Cocktail Shaker | Not a recommended use. | Not a recommended use. |
| Batter Mixer & Dispenser Container | Not a recommended use. | Not a recommended use. |
| Easy-Read Measuring Cups | Recommended use with 4-cup. | Not a recommended use. |
| Microwave Pasta Cooker | Recommended use. | Recommended use. |
| Ceramic Egg Cooker | Not a recommended use. | Not a recommended use. |
| Pancake Shaker Bottle | Not a recommended use. | Not a recommended use. |
| Make & Take Mason | Not a recommended use. | Not a recommended use. |
| Whipped Cream Maker Container | Not a recommended use. | Not a recommended use. |
| Measure-All® | Not a recommended use. | Not a recommended use. |
| Prep Bowls | Not a recommended use. | Not a recommended use. |
| Silicone Prep Bowls | Not a recommended use. | Not a recommended use. |
It is normal for there to be some suction of the blade to the bottom of mixing vessel. To minimize this, make sure there is space between the blending head and the bottom of the vessel.
Fully submerge the head of the Immersion Blender attachment into the food to help prevent splattering.
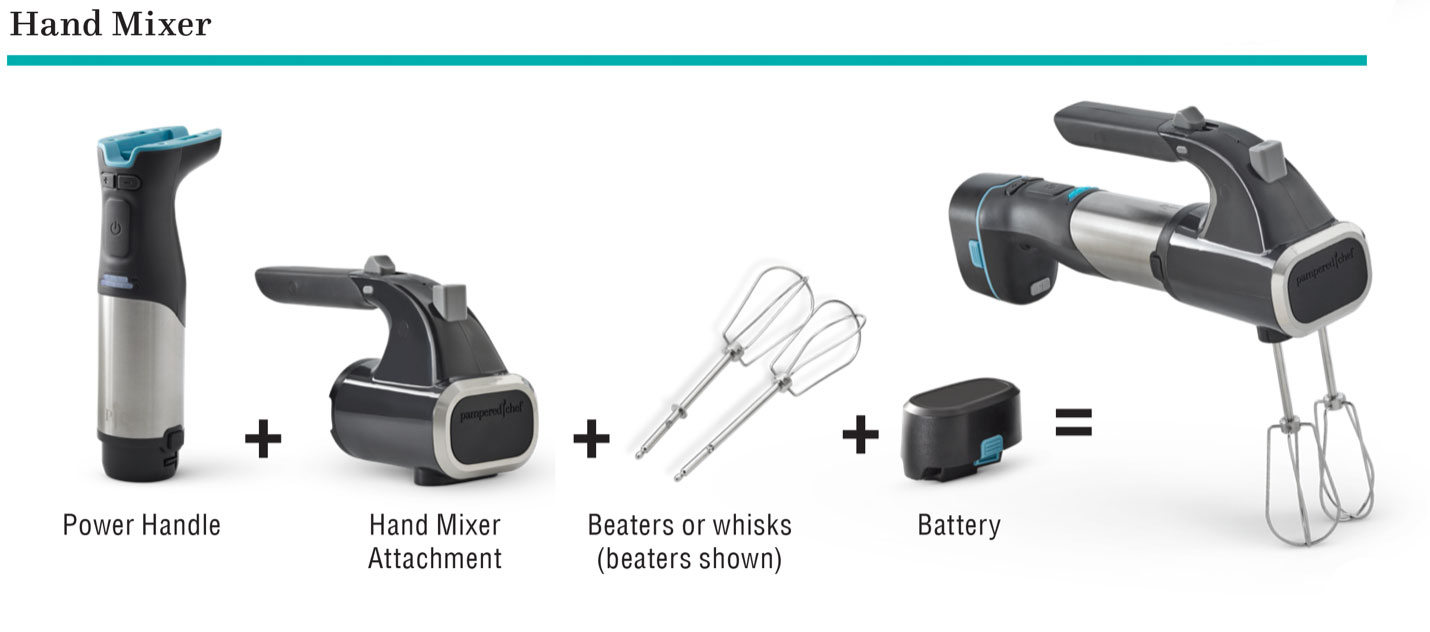
Hand Mixer
Remember, the battery is always installed last and removed first. Here’s a guide to assembling the Hand Mixer attachment.
One of the beaters has a collar that needs to be inserted into the larger opening of the Hand Mixer attachment. The use and care section “How to Use the Hand Mixer (Beaters and Whisks)” has an illustration that you can reference. The Flex+ also has icons to help you assemble it.
Neither of the whisks have a collar and can be inserted into either opening of the Hand Mixer attachment.
Yes! When the Hand Mixer attachment is attached to the power handle, the safety and speed buttons are now on the Hand Mixer attachment. To start the Hand Mixer attachment, push and hold in the safety switch on the left side of the unit and then use the Speed Adjust button to adjust the speed. The safety switch will reactivate after each use. The battery indicator lights on the power handle will still show battery life.
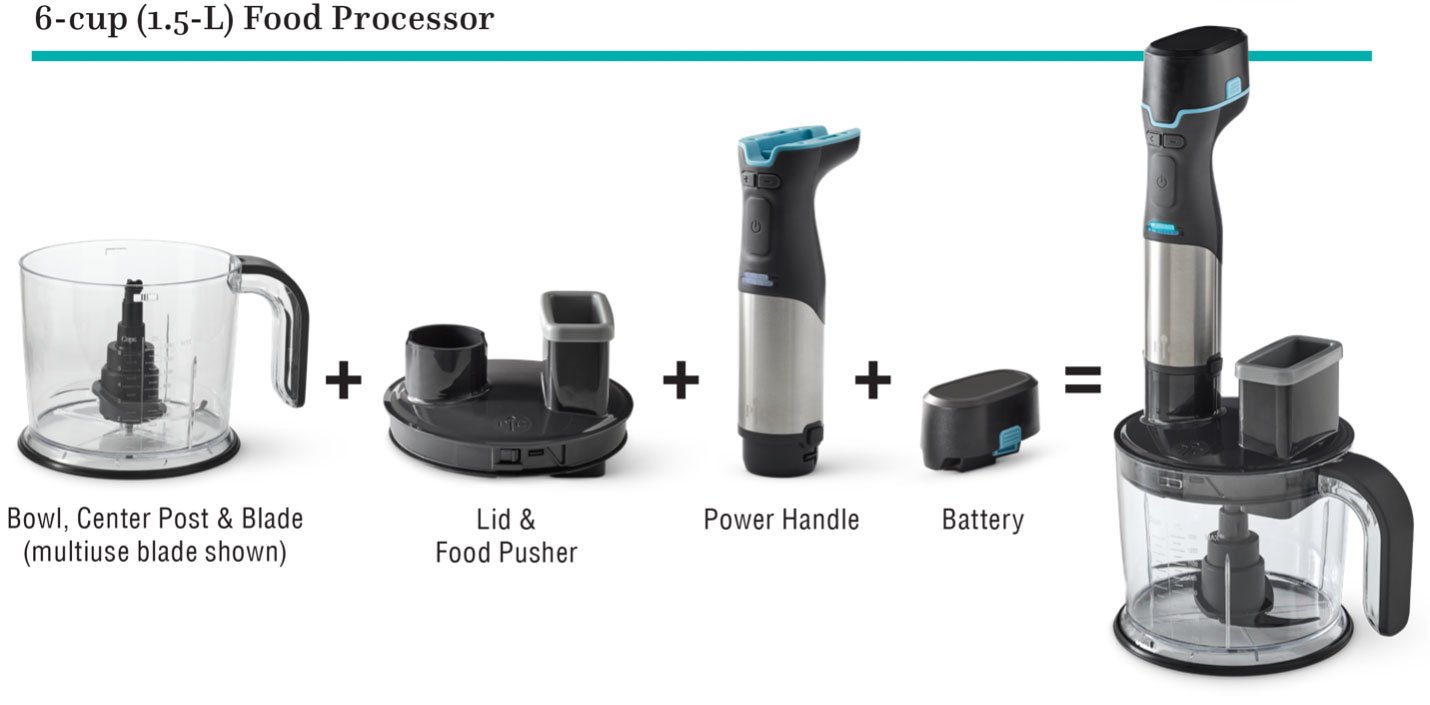
Food Processor
Remember, the battery is always installed last and removed first. Here’s a guide to assembling the 6-cup (1.5-L) Food Processor attachment.
6 cups (1.5 L).
The 6-cup (1.5-L) Food Processor attachment includes the accessories below.
• Multiuse Blade. It chops, mixes, purees, blends, dices, and minces veggies, herbs, breadcrumbs, dips, and salsas to the size and texture you want. This blade sits near the bottom of the center post.
• Grating Blade. It grates and shreds carrots for cake or salads, cabbage for slaw, broccoli for salads, and cheese for everything. It sits toward the top of the center post. Place the grating size (coarse/fine) face up. Add the ingredients through the food chute.
• Slicing Blade. It slices and shaves veggies for salads and sautes, potatoes and zucchini for gratins, and apples or any firm produce. (Don’t use to slice cheese.) It sits toward the top of the center post. Place the slicing size (thick/thin) face up. Add the ingredients through the food chute.
• Never use more than one attachment at a time.
• When grating or slicing do not use excessive pressure. Little to no pressure on the food gives the best results. Let the tool do the work.
1. Insert the center post and blade and attach the lid.
2. For quicker, more consistent processing, cut foods into uniform sizes before processing.
3. Click the safety lock button and press the power button. You can hold for continuous processing or pulse for short bursts. For the best results, always use the highest speed (5) unless otherwise noted.
4. The bottom of the bowl has a nonslip ring. However, if you’re not using the food pusher, hold the power handle with one hand and the food processor bowl with the other hand while operating for added stability.
5. Because it processes quickly, check during use so you get your desired cuts and texture.
• The bottom of the food processor bowl features a nonslip foot ring to keep the bowl stable. However, we recommend that you hold the power handle with one hand and the food processor bowl and lid or food pusher with the other hand while operating.
• Before processing, cut foods into uniform sizes to ensure quicker, even, and more consistent results.
• The safety lock button lets you use the unit within 5 seconds after being pressed.
• The 6-cup (1.5-L) Food Processor attachment cuts foods quickly so be sure to check the food during use.
• The speed will reset to the lowest speed after 10 minutes of use.
If the food processor is squeaking stop using, wait until the unit stops moving, take off the battery, and check to make sure the parts are assembled correctly. Assembling instructions are in the U&C.
Operating Functions
Here’s a guide to what the lights on the power handle mean.